Tag: cloudpc

  • Back from vacation – what did we miss?

    Like the swede I am, I’ve been off work for the last 4 weeks to get my summer vacation. I’ve actually done my best to try to stay away from IT stuff this summer, to disconnect and focus on other things (like golf and getting our house in order).

    But the world of IT does not slow down just because of summer, so here is a summary of some of the highlights that I missed during my time off!

    I got renewed as MVP

    Okay, this I already knew before the summer. But I was awarded for my 2nd year as an MVP within Windows and Devices for IT. I’m truly honored to be awarded for yet another year and being part of such a cool community of awesome people!

    Ola Ström | Most Valuable Professionals (microsoft.com)

    I will be speaking at WPNinja Summit

    I was picked to do two session at the WPNinja Summit in Baden, Switzerland, the 27th to 29th of September.

    I will do one session about Windows 365 networks and one about how to do better deployments of Windows 365.

    I’m really looking forward to this and I hope to see you all there!

    Windows 365 Switch in public preview

    At Microsoft Ignite 2022, Microsoft introduced three big new features coming to Windows 365. In May, Windows 365 Boot reached public preview as the first of the three. Now in August, the second and maybe my favorite, Windows 365 Switch reached public preview!

    Windows 365 Switch lets you switch between your physical PC and your Cloud PC through the task viewer, just like the other desktops you can have. It’s a really cool feature and I will cover this in a blogpost the upcoming weeks!

    You can read more about it in the official Microsoft blogpost found here: Windows 365 Switch now available in public preview – Microsoft Community Hub

    Windows 365 Frontline released

    This was actually announced before I left for summer vacation, but Windows 365 Frontline finally reached general availability!

    For those of you not familiar with this concept, this is a different licensing modell designed for scenarios where the users are not using their device all the time, user who work in shift where you have users coming an going. The concept is that you buy one license, but you get three Cloud PCs but only one can be used at the time.

    It sounds a little bit tricky, I know, but I covered this in an earlier blog post which you can have a look at.

    Read more about it in the Microsoft blogpost: Windows 365 Frontline is now generally available | Windows IT Pro Blog (microsoft.com)

    What’s new in Windows 365?

    Windows 365 got some other great updates during the summer as well as Microsoft released a lot of new features in both July and August.

    Some of the new features released was:

    • Move Cloud PC is now generally available
    • New setting to allow users to reprovision their own Cloud PC
    • Azure network connection (ANC) least privilege update
    • Provide feedback button for admins is now generally available
    • Windows 365 web client camera support (preview)
    • Group-based license support for Cloud PC resizing
    • Windows 365 app update notifications for users

    You can read more in details here about the new features: What’s new in Windows 365 Enterprise | Microsoft Learn

    Windows 11 23h2 release update

    Microsoft released new information about the Windows 11 23h2 update coming later this year. It is currently scheduled to be released in Q4 and will be released as an enablement package. This means that there are no big changes coming to the code base of Windows 11, and you can keep doing you testing on Windows 11 22h2 if you are still transitioning over to Windows 11.

    Microsoft also mentions a Windows 11 LTSC version in this update, which means that if you are waiting for that release, you can start preparing.

    Windows client roadmap update: July 2023 – Microsoft Community Hub

    What’s new in Intune?

    As per usual, Microsoft Intune has gotten it’s weekly updates during the summer. I think the most impactful update was the fact that uninstalling applications as an end-user in Company Portal is FINNALLY available! I know this has been something a lot of IT Pros has been waiting for. There are also a lot of new stuff in the 2307 Service release.

    Some highlights:

    • Uninstall Win32 and Microsoft store apps using the Windows Company Portal
    • Use the Turn off the Store application setting to disable end user access to Store apps, and allow managed Intune Store apps
    • New BitLocker profile for Intune’s endpoint security Disk encryption policy
    • Intune supports new Google Play Android Management API
    • Change to default settings when adding Windows PowerShell scripts
    • New settings available for the iOS/iPadOS web clip app type
    • Settings insight within Intune Security Baselines is generally available
    • Tamper protection support for Windows on Azure Virtual Desktop
    • Endpoint Privilege Management support to manage elevation rules for child processes

    What’s new in Microsoft Intune | Microsoft Learn

    Screen capture protection and watermark

    During the summer Microsoft updated how you can enable screen captrue protection and watermarks for Windows 365 (and Azure Virtual Desktop).

    Previously, you had to upload a custom ADMX template to enable these settings (or GPO), but they have now been made available in the built-in ADMX profile in Intune, making this setting much more accessible.

    I will cover this more in a future blog post

    Azure Virtual Desktop Watermarking Support – Microsoft Community Hub

    Screen capture protection in Azure Virtual Desktop – Azure | Microsoft Learn

    Microsoft Inspire 2023

    During the summer, Microsoft also held their Inspire conference which is usually more targeted towards partners, but there was a lot of good stuff announced and shared during the conference.

    Check out the main keynote here: Microsoft Inspire Keynote

    Any also the rest of the sessions: Session catalog (microsoft.com)

  • Custom name for Cloud PC

    Giving computers custom names is something which is somewhat of a hot potato. We have been doing it for years, and I’ve even blogged about it previously (olastrom.com – Naming conventions). It’s something which is important for some, but from an asset perspective it has kind of played out its role since it is not persistent.

    However, one thing that has been a really important thing for some, has been the possibility to configure the naming convention for Windows 365 Cloud PCs which has not been possible. Until now!

    With the update in the end of March 2023, this is now doable. It follows the same pattern as the naming convention for Windows Autopilot enrolled devices. You can set a prefix followed by variables. For Cloud PCs, these are a bit different, but follow the same idea.

    As you can see by the picture, the name can be between 5 and 15 characters and can include some additional characters except for numbers and letters. The computer name MUST include at least 5 random characters using %RAND:y% where y is the number of random alphanumeric characters. I can however leave out the username and only use random characters.

    Configure Cloud PC naming

    To configure Cloud PC naming, you can either create a new provisioning policy or change an already existing one. In this example, I will change one of my existing policies. This new setting is by default off in all existing policies and you will need to actively set this for new policies.

    Head into Microsoft Intune (intune.microsoft.com) and navigate to Devices > Windows 365 and select the Provisioning Policies tab.

    Either select “+ Create policy” or modify an existing policy. I’ve chosen to update my existing policy for my Swedish users. When you get to the “Configuration” step in the policy, you can enable the Cloud PC naming by checking the check-box. It will then display the option to enter a custom name.

    As you can see by my example, I’ve chosen to set the policy to give my Cloud PC a name which is CPC followed by five random alphanumeric characters followed by SWE. So, the name could end up being CPC-ABC12-SWE.

    Conclusion

    “With great power comes great responsibility”. Use naming wisely. To be honest, for Cloud PC naming makes slightly more sense since we don’t have serial numbers or such as an identified. However, naming will change once re-deployed since we have a random part of the name if is enforced. But with this function we can adapt it to fit with the rest of our naming conventions a bit more. You could even just set the same as for all other PCs (except you will get alphanumeric and not numeric random characters).

  • Cloud PCs and the Impossible travel

    Once upon a time, in a data center far far away….

    Here is something I learned the hard way in my own tenant. Windows 365 kind of messes with your account security if you are consuming Microsoft 365 services from another device than your cloud PC. Especially if you live in a country like Sweden where the Windows 365 service is yet not available in Sweden Central. Further more, it seams to only affect you the first few times you sign in, before the algorithms learn your behavior.

    What happened to me was that Identity Protection and user risk blocked me out from my Cloud PC, since I had defined it to block if user risk was too high and not password change.

    It took me a while to just realize what had happened, and how to get around it (since Identity Protection is not an area I’m to familiar with).

    Why is that?

    Well, there is something called “Impossible travel” or atypical travel which is used to assess the risk of your account being compromised, which means that it’s very unlikely that you would travel from let’s say Stockholm to Amsterdam within a few seconds. This is a very good thing to have in place since it will increase the security of your accounts a lot!

    This feature is a part of the Identity Protection part of the Azure AD (which requires a Azure AD P2 license), and can help you identify and take action on risky sign-ins performed by users, or detect if their credentials has been stolen.

    There are two key parts of this, Sign-in risk and User risk, and you can control what happens if a user does not live up to the expected level. And of course, Multifactor Authentication (MFA), plays a key role.

    Conclusion

    I’m not going to dig deep into this at all, just sharing an observation basically. If you want to read more about Identity Protection, I really recommend you having a look at the Microsoft Learn documentation, it provides a good overview.

    Like I stated in the beginning of my post, this was something I noticed in my lab, but I’ve not seen it in the wild so far in any production environment. For my environment, I solved it by dismissing the risk for my user which eventually allowed me to sign in.

    I’ve spent a good amount of time trying to reproduce this sign-in block, but I haven’t been able to yet.

    Have you seen something like this with Cloud PCs?

  • Get started with Microsoft Dev Box

    Some of you might have seen something called Microsoft Dev Box flash by in your feeds. Something called Dev Box doesn’t really sound like something device-related, it sounds more like something your developers would care about. They probably will, but there is a big reason you should care too.

    Microsoft Dev Box is a new tool in the toolbox for you, this time to provide Cloud PCs to your developers or such. There are many similarities between Dev Box and Windows 365, but also Azure Virtual Desktop (AVD). However, your developers can themself deploy computers to your tenant based on a template that you create, which means that a developer could create a new test PC when they need one without really involving you as an admin.

    Microsoft Dev Box is not licensed-based like your Windows 365 Cloud PC, instead, it’s consumption-based like an AVD. But you have the simplicity of setting up new computers from Windows 365, so it’s almost like a mix of the two. However, the user target group is different since you can get more powerful machines that are deployed by the user themself.

    You can read more about the Microsoft Dev Box here, and what Microsoft calls a “Dev Workstation in the cloud”.

    Getting started with Microsoft Dev Box

    To get started with Microsoft Dev Box you need the following:

    • An Azure subscription
    • Azure AD
    • Intune tenant
    • Windows licenses (typically as part of your EMS or M365 license)

    Setting up the Microsoft Dev box is completely taken care of in the Azure portal, not the Microsoft Endpoint Manager admin center.

    To start off, you need to head over to portal.azure.com and make sure you have an active Azure subscription to provision this. Then, search for Microsoft Dev Box.

    This is where your different environments will be hosted. You can have multiple Dev Boxes set up for different parts of the organization. In each Dev Box, you can also create different projects. In the real world, you would probably configure this in a landing zone specifically set up for your dev-users who will work on certain projects.

    The first step is to create a new Dev-center by pressing “+ Create” in the Microsoft Dev Box pane. Select what subscription and resource group you want to deploy this too and give your Dev-center a name. You will also need to select an Azure region where your machines will be hosted. Since this is a preview, the selection of what Azure data center regions are available is limited. Once you have selected this, press “Review + Create” and create your Dev-center.

    Once the Dev-center has successfully deployed, you need to create a Network Connection where you define if your Dev Box PCs should be hybrid-joined or Azure AD joined. Head back to the Microsoft Dev Box pane and select Network Connections (or search Azure for Network Connections).

    Select “+ Create” to create a new Network Connection by selecting what subscription and resource group to use. Also, give the network connection a name and select what Azure Vnet you would like to use (if you haven’t created a Vnet already, you will need to do that first). Press “Review + Create” and create your Network Connection.

    In this example I’m using Azure AD joined devices as selected as “Domain join type”. If you want to use Hybrid join instead, you will need to add some additional information about your domain.

    Once you have created your Network Connection, you will need to create a project. This is where gather each project you would like to use the Dev Box PCs in and define what machines are available by creating Dev Box pools. In the Microsoft Dev Box pane, select Projects.

    To create a new Project, click “+ Create” and select what subscription and resource group you want to use. Select which Dev-center you would to use and give your project a name. Press “Review + Create” and create your Project.

    Now we need to define what machines are available for our users by creating a Dev box pool. There are a few different “sizes” available, and you can read more about them on Microsoft site about Microsoft Dev Box, where you can find out the pricing for each.

    To create a new Dev box definition, navigate to the project you created earlier and select Dev box definition on the bottom of the left-hand menu.

    To create a new Dev box definition, select “+ Create“. Give your definition a name and then select a Windows image to use, in this example we will use a Microsoft-provided image, but you could upload your own if you would like. Make the appropriate selections of what size you would like on the machine and click “Create”.

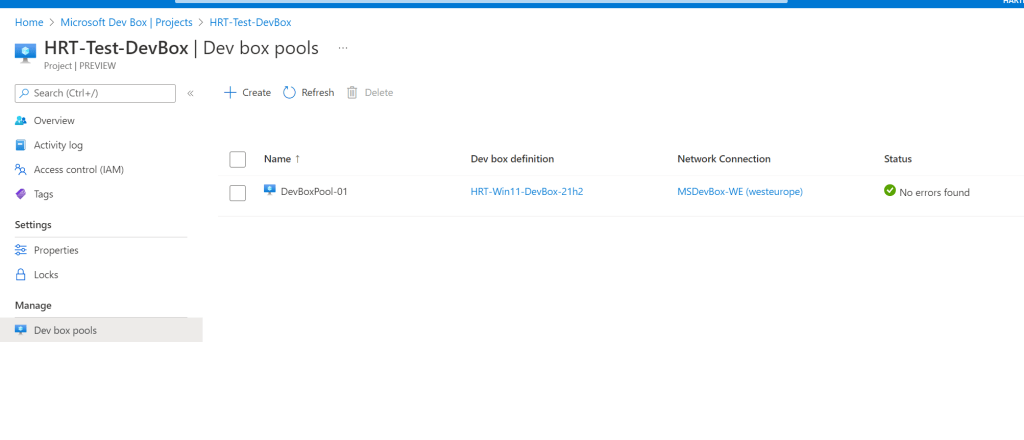
    The next step is to create a Dev box pool in your project, do this by navigating to your project you created earlier and selecting Dev box pool.

    Create a new Dev box pool by pressing “+ Create” and giving your new pool a name. Select the Dev box definition created earlier and also the network connection. You will also need to confirm that your organization has Azure Hybrid Benefit, you can read more about what that means here.

    Once you have filled out this, create the dev box pool by clicking “Create” at the bottom of the page.

    The last thing we need to do is to assign users the rights to consume machines and work in our project. Prior to this, it’s a good idea to create an Azure AD group that will contain our users.

    To configure the access to our project we will head into “Access control (IAM)” in our project.

    To add a new assignment, click “+Add” and select “Add role assignment”. In the list of roles, find and select the “DevCenter Dev Box User” role and press next.

    On the next page, add your Azure AD group which contains the users who should have access to the project. Once you have added this group to “Members” press “Review + assign” to finalize your role assignment.

    You can verify that the assignment was successful by looking in the list for the role and validating that your group is listed.

    And that’s it! You have now successfully prepared your environment to use Microsoft Dev Box!

    User experience

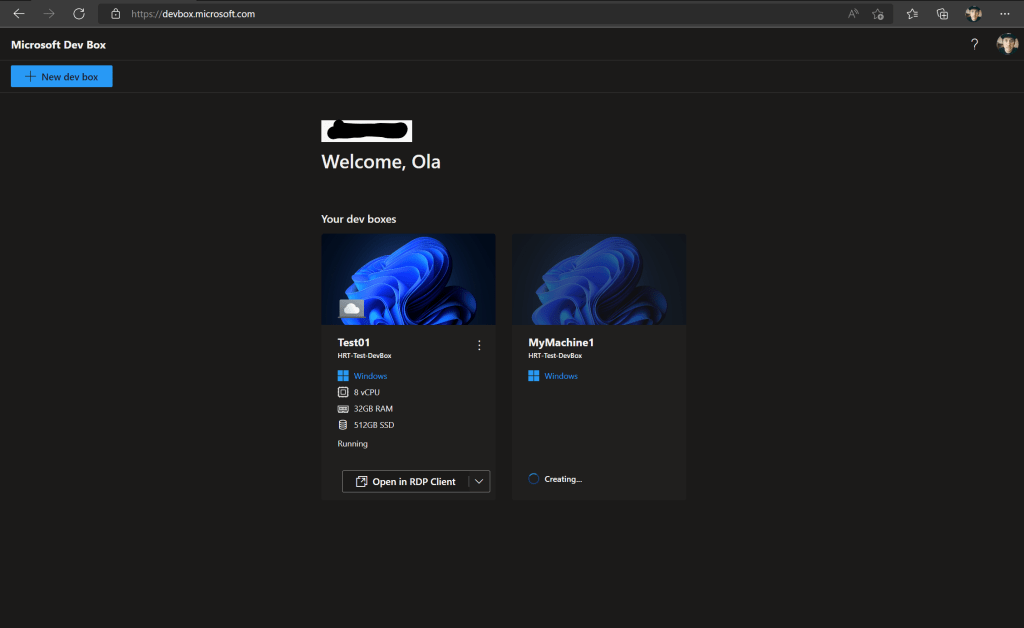
    For users to create new Microsoft Dev Box machines, they will need to access devbox.microsoft.com and sign in with their user account.

    Once signed in, the experience is similar to the Windows 365 end-user portal, but there is a new button called “+New Dev box” where users can deploy machines themself.

    Once you click that button, a fly-out will appear where you can see the specification on the machine you are allowed to deploy (based on the definition we made earlier) and you are asked to give your machine a name. Once you have given the machine a name, which will be the name displayed to you for your convenience (MEM will show a CPC-xxxxx name), press “Create“.

    The creation of a machine will take somewhere around 30-90 minutes. Once the machine is done, it will show in the portal where you are right now but also in the Remote Desktop app where you have all your other Windows 365 machines. A bonus fact is that it will also appear in the Windows 365 portal, marked as Dev box, but you cannot create new machines from there.

    Once the machine has been created, you can connect to it and start using it!

  • Disabling ESP on Cloud PC

    One thing you will notice if you are deploying Cloud PCs is that the Enrollment Status Page (ESP) from Windows Autopilot will or might appear when a machine is being set up. I’ve seen numerous instances where the ESP has failed causing the Cloud PC to lock out the user at the initial start. This is usually fixed by reprovisioning, but an unnecessary call to the service desk can cause frustration with your users and your administrators.

    The ESP is not an important part of the Windows 365 provisioning in most cases, hence it can be disabled by a custom policy.

    Create the policy

    To create a custom configuration policy, go to the Microsoft Endpoint Manager admin center (endpoint.microsoft.com) and navigate to Devices > Windows > Configurations Profiles.

    Select to create a new profile and select Custom as template.

    Give your profile a name based on your naming convention and press Next.

    Add a new OMA-URI setting by pressing Add.

    OMA-URI: ./Vendor/MSFT/DMClient/Provider/MS DM Server/FirstSyncStatus/SkipUserStatusPage

    Data type: Boolean

    Value: True

    Save your setting and press Next.

    Select to target All devices but filtered to only target Windows 365 devices. You can read more about how to do that in this blog post about filters.

    Finish the wizard by clicking Next until you reach the last step, then click Create.

    You have now successfully created a configuration profile that will skip the ESP for all your Cloud PCs.

    Summary

    The ESP is something that in Windows Autopilot is very useful, but for Windows 365 it’s not crucial. This will also reduce the risk of random errors during provisioning.

    Applications that are needed before the user starts working can be assigned using the assignments to “All Devices” and filter out your Cloud PCs since this will evaluate a lot faster than Azure AD groups.