Tag: MEM

  • Get started with Microsoft Dev Box

    Some of you might have seen something called Microsoft Dev Box flash by in your feeds. Something called Dev Box doesn’t really sound like something device-related, it sounds more like something your developers would care about. They probably will, but there is a big reason you should care too.

    Microsoft Dev Box is a new tool in the toolbox for you, this time to provide Cloud PCs to your developers or such. There are many similarities between Dev Box and Windows 365, but also Azure Virtual Desktop (AVD). However, your developers can themself deploy computers to your tenant based on a template that you create, which means that a developer could create a new test PC when they need one without really involving you as an admin.

    Microsoft Dev Box is not licensed-based like your Windows 365 Cloud PC, instead, it’s consumption-based like an AVD. But you have the simplicity of setting up new computers from Windows 365, so it’s almost like a mix of the two. However, the user target group is different since you can get more powerful machines that are deployed by the user themself.

    You can read more about the Microsoft Dev Box here, and what Microsoft calls a “Dev Workstation in the cloud”.

    Getting started with Microsoft Dev Box

    To get started with Microsoft Dev Box you need the following:

    • An Azure subscription
    • Azure AD
    • Intune tenant
    • Windows licenses (typically as part of your EMS or M365 license)

    Setting up the Microsoft Dev box is completely taken care of in the Azure portal, not the Microsoft Endpoint Manager admin center.

    To start off, you need to head over to portal.azure.com and make sure you have an active Azure subscription to provision this. Then, search for Microsoft Dev Box.

    This is where your different environments will be hosted. You can have multiple Dev Boxes set up for different parts of the organization. In each Dev Box, you can also create different projects. In the real world, you would probably configure this in a landing zone specifically set up for your dev-users who will work on certain projects.

    The first step is to create a new Dev-center by pressing “+ Create” in the Microsoft Dev Box pane. Select what subscription and resource group you want to deploy this too and give your Dev-center a name. You will also need to select an Azure region where your machines will be hosted. Since this is a preview, the selection of what Azure data center regions are available is limited. Once you have selected this, press “Review + Create” and create your Dev-center.

    Once the Dev-center has successfully deployed, you need to create a Network Connection where you define if your Dev Box PCs should be hybrid-joined or Azure AD joined. Head back to the Microsoft Dev Box pane and select Network Connections (or search Azure for Network Connections).

    Select “+ Create” to create a new Network Connection by selecting what subscription and resource group to use. Also, give the network connection a name and select what Azure Vnet you would like to use (if you haven’t created a Vnet already, you will need to do that first). Press “Review + Create” and create your Network Connection.

    In this example I’m using Azure AD joined devices as selected as “Domain join type”. If you want to use Hybrid join instead, you will need to add some additional information about your domain.

    Once you have created your Network Connection, you will need to create a project. This is where gather each project you would like to use the Dev Box PCs in and define what machines are available by creating Dev Box pools. In the Microsoft Dev Box pane, select Projects.

    To create a new Project, click “+ Create” and select what subscription and resource group you want to use. Select which Dev-center you would to use and give your project a name. Press “Review + Create” and create your Project.

    Now we need to define what machines are available for our users by creating a Dev box pool. There are a few different “sizes” available, and you can read more about them on Microsoft site about Microsoft Dev Box, where you can find out the pricing for each.

    To create a new Dev box definition, navigate to the project you created earlier and select Dev box definition on the bottom of the left-hand menu.

    To create a new Dev box definition, select “+ Create“. Give your definition a name and then select a Windows image to use, in this example we will use a Microsoft-provided image, but you could upload your own if you would like. Make the appropriate selections of what size you would like on the machine and click “Create”.

    The next step is to create a Dev box pool in your project, do this by navigating to your project you created earlier and selecting Dev box pool.
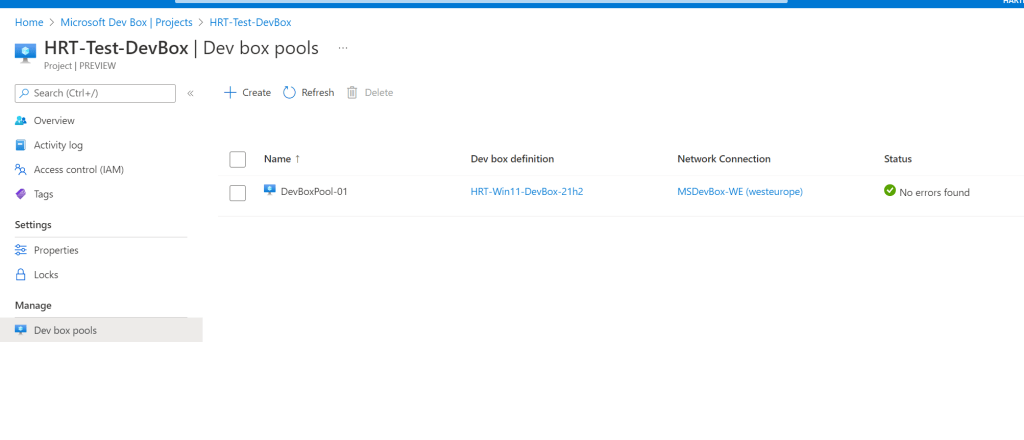
    Create a new Dev box pool by pressing “+ Create” and giving your new pool a name. Select the Dev box definition created earlier and also the network connection. You will also need to confirm that your organization has Azure Hybrid Benefit, you can read more about what that means here.

    Once you have filled out this, create the dev box pool by clicking “Create” at the bottom of the page.

    The last thing we need to do is to assign users the rights to consume machines and work in our project. Prior to this, it’s a good idea to create an Azure AD group that will contain our users.

    To configure the access to our project we will head into “Access control (IAM)” in our project.

    To add a new assignment, click “+Add” and select “Add role assignment”. In the list of roles, find and select the “DevCenter Dev Box User” role and press next.

    On the next page, add your Azure AD group which contains the users who should have access to the project. Once you have added this group to “Members” press “Review + assign” to finalize your role assignment.

    You can verify that the assignment was successful by looking in the list for the role and validating that your group is listed.

    And that’s it! You have now successfully prepared your environment to use Microsoft Dev Box!

    User experience

    For users to create new Microsoft Dev Box machines, they will need to access devbox.microsoft.com and sign in with their user account.

    Once signed in, the experience is similar to the Windows 365 end-user portal, but there is a new button called “+New Dev box” where users can deploy machines themself.

    Once you click that button, a fly-out will appear where you can see the specification on the machine you are allowed to deploy (based on the definition we made earlier) and you are asked to give your machine a name. Once you have given the machine a name, which will be the name displayed to you for your convenience (MEM will show a CPC-xxxxx name), press “Create“.

    The creation of a machine will take somewhere around 30-90 minutes. Once the machine is done, it will show in the portal where you are right now but also in the Remote Desktop app where you have all your other Windows 365 machines. A bonus fact is that it will also appear in the Windows 365 portal, marked as Dev box, but you cannot create new machines from there.
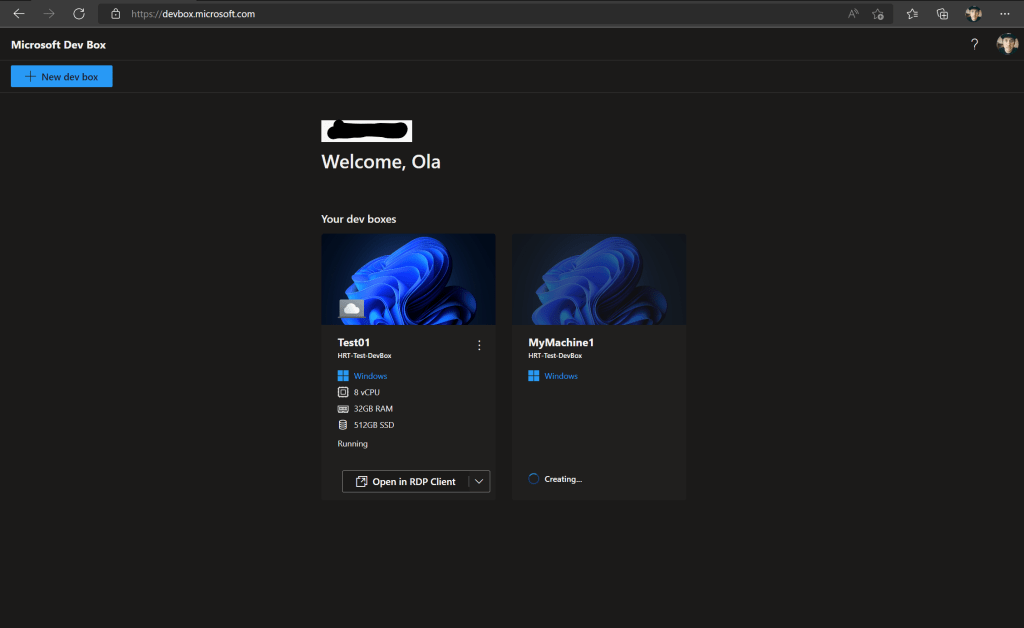
    Once the machine has been created, you can connect to it and start using it!

  • Disabling ESP on Cloud PC

    One thing you will notice if you are deploying Cloud PCs is that the Enrollment Status Page (ESP) from Windows Autopilot will or might appear when a machine is being set up. I’ve seen numerous instances where the ESP has failed causing the Cloud PC to lock out the user at the initial start. This is usually fixed by reprovisioning, but an unnecessary call to the service desk can cause frustration with your users and your administrators.

    The ESP is not an important part of the Windows 365 provisioning in most cases, hence it can be disabled by a custom policy.

    Create the policy

    To create a custom configuration policy, go to the Microsoft Endpoint Manager admin center (endpoint.microsoft.com) and navigate to Devices > Windows > Configurations Profiles.

    Select to create a new profile and select Custom as template.

    Give your profile a name based on your naming convention and press Next.

    Add a new OMA-URI setting by pressing Add.

    OMA-URI: ./Vendor/MSFT/DMClient/Provider/MS DM Server/FirstSyncStatus/SkipUserStatusPage

    Data type: Boolean

    Value: True

    Save your setting and press Next.

    Select to target All devices but filtered to only target Windows 365 devices. You can read more about how to do that in this blog post about filters.

    Finish the wizard by clicking Next until you reach the last step, then click Create.

    You have now successfully created a configuration profile that will skip the ESP for all your Cloud PCs.

    Summary

    The ESP is something that in Windows Autopilot is very useful, but for Windows 365 it’s not crucial. This will also reduce the risk of random errors during provisioning.

    Applications that are needed before the user starts working can be assigned using the assignments to “All Devices” and filter out your Cloud PCs since this will evaluate a lot faster than Azure AD groups.

  • Autopilot registering for non admins

    Windows Autopilot is a really nice thing, I think you all are familiar with this by now. But the process to add devices, and adding devices without being an administrator, isn’t really that straightforward with exporting CSV’s and such. The way I usually import the hardware IDs is by using the Get-WindowsAutopilotInfo.ps1 PowerShell script.

    The built-in roles in Microsoft Endpoint Manager do not give you rights to add or remove devices, you need to create a custom role for this.

    There are two options here, you could either duplicate an existing role such as the Help Desk Operator role and add the Enrollment Programs rights which you will need, or you can create a new custom role.

    Creating a custom role for this could be very useful if you want to provide the possibility for your e.g. deskside support personal or a hardware coordinator to upload hardware IDs if this was not done by your hardware vendor.

    In this example, I’ve created a new role called “Windows Autopilot Operator”.

    Create a new role

    Head to the Microsoft Endpoint Manager portal and navigate to Tenant Administration > Roles and click “+ Create” (or mark the role you want to duplicate and click the duplicate button).

    Give your new role a name such as “Windows Autopilot Operator”.

    Click next and find the heading “Enrollment programs” and enable:

    • Sync device
    • Delete device
    • Create device
    • Read device

    Click through the wizard and create the new role.

    We now need to assign this to a group of users. When the role is created, click on the role and go to Assignments.

    Click “+ Assign” and give your assignment a name, such as Deskside Support or something describing what kind of users will be in this assignment.

    Click next and add a group containing your users.

    On “Scope groups”, add all users and all devices.

    Complete the wizard and you have now created an assignment. If you wish to add more assignments, you can just click the “+ Assign” button again and repeat the steps.

    Importing the hardware ID

    We can now get started with importing the hardware ID into our tenant! You can do this either from the Out of Box Experiance (OOBE) process or in runtime. Since I think we all know how it works in run time, let’s have a look at what it looks like during OOBE.

    In this example I’m using a virtual machine, but you need to have passed the Wi-Fi selection part if you are doing this on Wi-Fi since we need internet connectivity.

    During the OOBE process, press SHIFT + F10 (don’t forget FN if you have such keyboard). Type powershell and hit enter.

    You have now launched PowerShell in your terminal, and we can get going with executing the following three lines. You will during the have to confirm that you want to install the script, just press “y” and enter when asked to.

    Set-ExecutionPolicy -Scope Process -ExecutionPolicy Unrestricted
    Install-Script -Name Get-WindowsAutoPilotInfo
    Get-WindowsAutoPilotInfo.ps1 -online

    When you run the third line of PowerShell code, you will be prompted to sign in with you account. If this is the first time you are running the online version, you will need to consent the sign in first (it will show up on the screen).

    Once signed in, the process will start and the Hardware ID will be harvested and uploaded to your tenant.

    This process usually takes a few minutes. Once completed, turn off the computer.

    If you have a look in your Windows Autopilot devices list in the Microsoft Endpoint Manager by going to Devices > Windows > Windows Enrollment > Devices you can see that the devices has been uploaded.

    Depending on how you are assigning deployment profiles, this will usually be assigned within 15 minutes. Once the profile has been assigned, you can start the computer again and enroll it!

    Bonus tip

    If you are using group tags to assign profiles like I do in my lab, you can actually do this while running the script by adding “-GroupTag ‘[YourTag]’” at the end of the script.

    Get-WindowsAutopilotInfo.ps1 -online -GroupTag '[YOUR TAG]'

    This will automatically add the group tag to the device entry, and if your automated profiles assignment is depending on this everything will happen automatically!

  • Remote actions in Endpoint Manager

    One question I get a lot from people that are fairly new to Microsoft Endpoint Manager is “which function should I use to reset a Windows device?” and what the different buttons actually do.

    So here is a little cheat sheet what the different type of reset of a Windows device does. Some also applies for other platforms, which I will mention below.

    One thing you will notice when clicking these options in the portal, you will always have to confirm your selection.

    Retire

    This is the first option you will glance at when looking at the remote actions available in the ribbon.

    Retire is not a Windows unique feature and is maybe mostly used in a BYOD scenario, but could be applicable for some corporate scenarios as well.

    Retire means that you will remove the connection to Microsoft Endpoint Manager and at the same time remove all data YOU put there through MEM, such as apps, profiles, policies etc. You could basically call this an “unenrollment” of the device.

    A usefull scenario would be when a user is leaving the comapny and is keeping their iPhone which has been been enrolled through a more BYOD scenario. You will only remove corporate data, but leave all the users personal data.

    This feature is maybe not that commonly used for Windows since these devices would typically be “locked” to the tenant using Autopilot. But for BYOD scenarios, this could be applicable.

    Wipe

    Wipe is just what it sounds like. You will wipe all data from the device and put it back to factory defaults. This feature can be used on other platforms too. This is the feature I most frequently use, especially when testing things and needing to enroll things. This is equal to doing a factory reset from within the operating system. This is perfect for when a device is being decomissioned.

    For Windows you get a few more options when triggering the option:

    • Wipe device, but keep enrollment state and associated user
    • Wipe decice and continue wipe even if device loses power

    Typically, you dont need to select any of these but there are some cases where it could be usefull.

    The wipe will also remove the device from Microsoft Endpoint Manager, IF not the first option is selected. The Azure AD object will remain and also the Windows Autopilot object, if you are using Windows Autopilot.

    The “Wipe device, but keep enrollment state and associated user” will reset wipes all policies, but keeps user accounts and data, but not user files. It will reset user settings back to default. and resets the operating system to its default state and settings. This basically means that the device will be put back into the same state it was when it was first enrolled. If you are using Autopilot, use Autopilot reset instead.

    The “Wipe decice and continue wipe even if device loses power” means that the device will continue to try to wipe untill its successfull. This is great for instance if the device is lost and you really want to make sure that the device is wiped for corporate data. This could in worse case leave the device unbootable if something happens. So use it with causion!

    Delete

    The delete option is exactly what it sounds like, you will delete the device form Microsoft Endpoint Manager. However, this will only remove the link and all data on the device will remain. However, the next time the device connects to Microsoft Endpoint Manager, corporate data will be removed.

    This is mostly usefull when cleaning up any stale objects. Cleaning up stale object could with ease however we automated by using the automated clean-up rules in Microsoft Endpoint Manager found in Devices > Device clean-up rules.

    Fresh start

    Fresh start is a farily unknown feature in Windows which was introduced back in 2017.

    What fresh start does is to remove any pre-installed software by the manufacturer (OEM) which is usally there. The computer will then run a more “Vanilla” version of Windows after the Fresh start.

    When triggering this reset, there is an option to retain the user data, including enrollment, which would have little to no impact for the user. If this option is not selected, the device will be reseted and start up on the OOBE screen.

    This could be usefull for cleaning out devices which has been delivered with an OEM image instead of a pure Windows image, or if the device is not purchased through your regular channels and getting the “wrong” image which includes pre-installed software.

    Autopilot reset

    Last out is the Autopilot reset, which is a really useful option if you are repurposing a computer from one user to another.

    What Autopilot reset does is that it will restore the device back to a business ready state, meaning that all personal data is removed but all corporate settings are re-applied. All management information about the device is kept and so is the Azure AD object with all its device group memeberships. Doing this will also remove the primary user associated with the device.

    When the device is handed to a new user, all they need to do is to sign in and the computer will finilize the setup for them. Users will not be able to use the device until the user enrollment parts are finilized, just like with any other Autopilot enrolled device.

    Update: Got this pointed out to me by several people so I thought I would add this here as well. Autopilot Reset is NOT supported on Hybrid Azure AD Joined devices.

    Key take aways

    I hope this brings some clarity to the different remote actions and that you can figure out which to use when.

    The ones I most commonly use are:

    • Wipe when testing things in my lab or completly changing what the device is used for, e.g. assigning a different Deployment Profile to the device.
    • Delete when I for some reason have ghost/stale objects
    • Autopilot reset when a device is being repurposed or changing user

    The other ones are ofcourse useful, but maybe not something I frequently use.

  • RBAC in Intune- Who does what at the zoo

    One thing that is important when working with IT infrastructure is to set the right level of permissions for the right people. Principle of least privilege is a good rule of thumb to follow, also in Microsoft Endpoint Manager.

    It’s quite easy to just say that “okay, all admins gets the administrator role” which make everyone equal. But is it a good idea? No.

    Microsoft Endpoint Manager (MEM) has a quite extensive Role Based Access Control (RBAC) function built in, and there are also Azure roles which applies to MEM. There is also the possibility to create your own custom roles if you want to define the roles yourself, or if you want to limit one of the built in.

    Why use RBAC?

    There is a simple answer to this. Improve security. Granting admin permissions to everyone administrating the system isn’t necessary. Your level of permissions should be related to what task you are performing. A Help Desk operator does not have the same needs as a third level support engineer; hence they should not have the same level of access.

    Aiming for the principle of least privilege when looking at how to administrate MEM is important and implementing it at an early stage so that you assign roles accordingly.

    For certain scenarios, there might be a need for users to have additional levels of access, being able to elevate Intune admin for example through Privileged Identity Management (PIM) but having a less privileged access as their normal level. Please note however, that PIM is an Azure AD P2 feature which you will need to make sure you are licensed for (it’s included in EMS and M365 E5 license SKU, but not in the E3 SKU).

    Quick and dirty setup

    So how to get going? One efficient way of doing it, which I like, is to firstly identify what roles you have in your organization and then map out what roles they should have. I prefer doing this in Excel, just listing the roles and then look at what Azure AD roles are related to MEM and then add the built in MEM roles. Then just simply add an X on who should have what roles. As you see in the example down below, some operational roles have several X in their row.

    This should be adopted towards your organization and roles named what you are calling them.

    Update: You can find my example Excel here.

    Can I use PIM?

    Using PIM, especially for admin roles should be a default when you are setting this up. You will need additional licenses, but you will not need this for all users only your admin users.

    For Azure AD you can use PIM without any hassle, it’s easy to setup and you can set it to automatic approvals. Have look at this Microsoft Docs article on how to do it!

    I would suggest having PIM for all roles which are called admin, so for MEM specific roles that is the Intune Administrator role and the Azure AD Joined Device Local Administrator role, but there are additional roles related to this area.

    When it comes to using PIM on MEM specific roles, this isn’t as straight forward. You will need to take a different approach. PIM for Intune roles could be argued how beneficial this is, but it does improve security and resilience. However, you need to use a preview feature for this called Privileged Access Groups which is a part of PIM, and you will need to make sure to enable your Azure AD group for role assignment when creating it (this can’t be added creating the group). The people over at MSEndpointManager.com have create a great guide about how to set this up.

    But in short what you need to do is to create a group which is enabled for Azure AD roles assignment.

    Then enable Privileged Access on the group you created to add it to PIM.

    Then you can assign your role in MEM to this group.

    In this example I’m assigning PIM to my Help Desk Operator role.

    Doing this, you could potentially enable PIM for all your MEM roles. I would however not use PIM for roles which are read only roles.

    Key takeaway

    There are a bunch of built-in roles in MEM which covers most scenarios. However, there might be instances where you need to tweak this a little bit. A good example of this is the Remote Help role which I wrote about in my previous post. Remote Help might be useful for people who are not working in Intune as part of their daily job, this could be application specific support personal for example who don’t need access in MEM but have the need to remotely support their users.

    Getting RBAC in place at an early stage will simplify operations and getting the right permissions for everyone involved down the line, and you will decrease misshappenings. Or just simply shadow IT doing their own thing in your controlled environment without change control or the approvals from the governance forums.